Welcome

I am constantly amazed at how animated and talkative people get when you mention food. The mere aroma of certain foods can evoke memories that transport us back to a special place and time. Food can bridge the gap between all ages, races and ethnicities.
Let's face it, the only thing that should ever come between people is a table and some serving bowls.

Friday, March 28, 2008

Italian Penicillan

Vermilionink/flickr

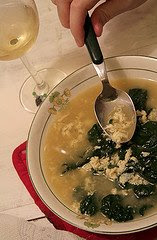
I have eaten very little since I came down with this thing, it wasn’t bad the first few days but by day three my stomach rumblings were beginning to scare those around me. I really don’t have much of an appetite but I know that you can never go wrong with soup. I was just going to do plain old egg drop soup but decided to kick it up a bit and make it Italian style. Let’s hope it helps, I am still feeling pretty lousy.

Italian Egg Drop Soup

1 qt. rich chicken stock
2 eggs
1/4 c. freshly shredded Romano or Parmesan cheese

I always like greens in mine so I always add a couple good handfuls of kale, spinach or escarole to the broth.

Heat broth to boiling, beat eggs and cheese together, pour mixture into boiling broth and remove pan from heat; do not stir

Tuesday, March 25, 2008

Bad Case of the Flu

I'll be back shortly, I just need to rest for a few days.

Friday, March 21, 2008

Pizza Bianca

CknLomeins?Flickr.com

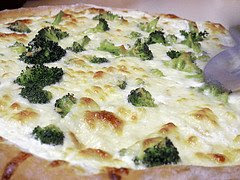
I have always been a huge fan of white pizza; I actually prefer it over the traditional with tomato sauce. Don’t get me wrong that doesn’t mean that I’d pass up a slice of the tomato sauce laden pie but if given the choice I will always choose the white.
I have grown up with some really great pizza makers, my aunt, grandmother and I even had an uncle that use to make a pretty mean pizza. Over the years I have honed my own pizza making skills mostly because I really haven’t had much luck finding any pizzeria’s around here that I like. There is one exception though, a little place called Surace’s right around the corner, so close I can walk to it. Surace’s makes this white veggie pizza that I adore, it comes with lots of cheese olive oil, garlic, broccoli and artichokes. I tweak mine a bit and order it with extra cheese and anchovies, it is so good.

White Pizza

Pizza dough (your recipe, store bought, frozen bread dough, whatever you like to use)
Extra-virgin olive oil, for drizzling
3 large cloves garlic, minced
1 cup shredded mozzarella
1 cup shredded provolone (may also use any other cheese you prefer)
1/2 cup grated Parmesan or Romano
1 (15-ounce) can artichoke hearts in water, drained and thinly sliced
Cut up broccoli, Spinach (again, whatever you like)
Anchovies (optional)
1/4 cup chopped parsley

Preheat oven to 425-450 degrees F.

Press out dough or place store bought shell onto a pizza pan or cookie sheet.
Drizzle dough with oil and scatter minced garlic over dough to the edges.
Cover with all of the cheeses combined and work all the way to the edge of the dough.
Top with artichoke hearts, broccoli (whatever toppings you like)
Cook 8 to 10 minutes, until cheeses have melted and begin to bubble. Remove from oven and garnish with parsley. Cut with pizza wheel or knife into squares or wedges and serve.
Tuesday, March 18, 2008

The Baking Sisters

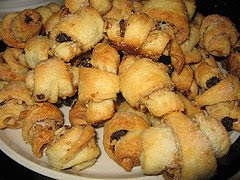
My aunt Jay is back in the kitchen baking today making her famous rugelach. For a little Italian lady she makes a mean Jewish pastry, even her Jewish friends agree. This time her only assistant in the kitchen will be my grandmother, no gentlemen callers today.
My grandmother will be transporting some of that rugelach back to Rochester for all of us, aren’t aunts and grandmothers’ the best!

Rugelach

1 cup of butter
1 pkg. (8 oz.) cream cheese, softened
4 cups sifted flour
1 cup sour cream
1 cup sugar
1/2 cup chopped raisins
1/2 cup finely chopped nuts
2 Teaspoons ground cinnamon

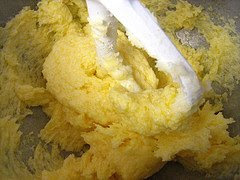
Blend butter and cream cheese until smooth. Slowly add flour and sour cream; beat until it is mixed well. Cover; refrigerate overnight. Add together sugar, raisins, nuts and cinnamon. Divide dough into 6 parts.
On a floured board, roll the balls into a 9 inch circle then slice into 10 wedges. Place a heaping teaspoon of sugar mixture in center of each wedge. Roll each wedge. Place on baking sheet and bake at 400 degrees for approximately 25 minutes.

Makes about 5 dozen.

Sunday, March 16, 2008

Gentlemen Prefer Cookies!

Remember going to a bar or a club to meet men? Well I found out this morning that bars and clubs are a thing of the past. If you really want to get a man interested entice him with cookies! This little piece of knowledge came my way in the form of an innocent phone call to my grandmother (88 yrs.) and aunt (91 yrs.) in Florida. My grandmother answered the phone and said, “Guess what your aunt and I are doing today”? We are having a nice gentleman over to teach him how to bake cookies. After my mouth dropped for a second I thought, how cute. It turns out my aunt Jay had been giving some of her cookies to her mail carrier who in turn shared some of the cookies with a friend of his. Well his friend loved them and wanted to know who made them, long story short the man was introduced to my aunt, they became friends and today at 1:00 pm he is having lunch with my grandmother and aunt who are then both going to teach him how to bake Italian lemon cookies.
Italian Lemon Cookies


4 cups flour
1 cup of sugar
8 Teaspoons of baking powder
3 eggs
3/4 cup of milk
1/2 cup of butter, softened
4 Teaspoons of lemon extract
1 Teaspoon of lemon zest (optional)

Mix all ingredients together (by hand or mixer). Drop onto greased cookie sheet. Bake at 400 degrees for 5 to 7 minutes.

FROSTING:
1 box confectioners' sugar
1 teaspoon of lemon extract
3 Tablespoons of Milk (should be runny enough to drizzle, if too thick add a little more milk)

Mix and pour over cookies as desired.

Thursday, March 13, 2008

Horton Hears A Who! Frying What? Where?


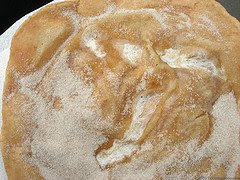
Don’t worry Horton; it’s only me that you hear. I am in the kitchen frying up a batch of elephant ears. I promise you that your ears are safe, not one single elephant has ever lost their ears or their life in the making of this recipe.

I never made the connection until recently that elephant ears and the fried dough I grew up with were one in the same. We always used pizza dough for our “Pizza Fritte” what we grew up knowing as fried dough. The ingredients for the elephant ears are almost the same except that the elephant ears use a Crisco type shortening and the pizza dough uses oil. I always find it interesting that so many cultures have similar versions of the same recipe. Indian fry bread and Sopapillas are another example of culturally popular fried dough recipes with very subtle changes to their ingredients and preparation. I guess one thing we can be certain of that no matter what it’s called or what part of the world it’s from people are definitely united in their love of fried dough.

Elephant Ears (not real elephant ears, Horton)!

1 1/2 cups milk
1 tsp. salt
2 packets dry yeast
2 tbsp. sugar
6 tbsp. shortening (Crisco)
4 cups flour
Oil for frying

Toppings:
Melted butter (optional)
Powdered sugar, sifted
Cinnamon/sugar mix

Heat but do not boil milk, sugar, salt and shortening until shortening is melted. Cool to lukewarm. Add yeast and stir until dissolved. Stir in flour 2 cups at a time, beating until smooth after reach addition.
Put into greased bowl. Cover with damp cloth, let rise until double. Dust hands with flour. Pinch off pieces of dough size of golf ball. Stretch into 6-8 inch circle. Drop into hot oil in pan large enough to fry 6-8 pieces. Fry until pieces rise, turn with tongs and fry until light brown. Drain on paper towels and sprinkle with desired topping.

Tuesday, March 11, 2008

Horde Of The Rings

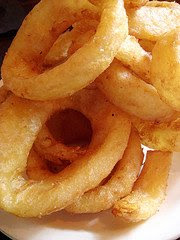
We take for granted just how easy some foods are to prepare ourselves. It seems that we are so conditioned to automatically purchase certain foods pre-made at a supermarket or by taking a quick trip through a drive thru. I started to think about this when a friend of mine asked me to pick up some frozen onion rings at the supermarket to have with dinner, I said you are kidding those aren’t even real onion rings. They are just minced onion and mostly bread crumbs. I told her I would just make the onion rings, she looked shocked. You know how to make onion rings (like it was some mysterious government secret) I said yes and they are really easy to make and taste a lot better than anything you’d get from a store or drive thru not to mention how much more you would get for a lot less money. So I proceeded to make the onion rings as she watched looking at me like I was some great magician. As soon as she took her first bite she never wanted store bought or drive thru again.
It really is silly the money we waste on certain foods just to save a little time, we get so little and spend so much for what? I think taking the time affords us more in our lives and it sure as hell tastes a lot better when we do.

Beer Battered Onion Rings

1 1/2 cups of flour (pancake mix also works well)
1 1/2 cups of beer, active or flat, cold or at room temperature (Guinness makes for a really rich tasting batter and color but any beer will do).
3 lbs of Bermuda onions, Vidalia or any variety that you like
4 cups shortening or oil
Salt to taste (it's best to salt them right when they come out of the fryer)

Combine flour and beer in a large bowl and blend thoroughly, using a whisk. Cover the bowl and allow the batter to sit at room temperature for no less than 3 hours. Twenty minutes before the batter is ready, preheat oven to 200 degrees. Place brown paper from grocery bags or layers of paper toweling on a jelly roll pan. Carefully peel the papery skins from the onions into 1/4 to 1/2 inch thick slices.
Separate the slices into rings and set aside.
Heat electric frying pan to 375 degrees and heat the cooking oil. With metal tongs, dip a few onion rings into batter. Then carefully place them in the hot oil. Fry rings, turning them once or twice until they're an even, delicate golden color. Now transfer to the paper-lined pan. To keep warm, place them on the middle shelf of the oven until all the onion rings have been fried.

Sunday, March 9, 2008

Italian Eggs Benedict

photo by Lucahjin/Flickr.com

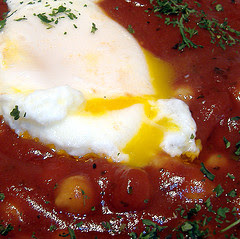
As much as I love Eggs Benedict my heart still longs for another, Italian Poached Eggs (eggs in marinara sauce). This was a traditional breakfast staple in many Italian homes and it was not uncommon to see this dish show up on the dinner table as well. This is old world comfort food a tasty feast of aromas as well as flavors to fill the senses and feed the soul.

Easy Marinara Sauce (to poach your eggs in)

1 large can (29 oz.) whole tomatoes, juice and all (squeeze tomatoes in hand to crush a little)
1/8 cup olive oil
4 oz. tomato paste
1 tbsp. parsley
1 tbsp. basil
1/4 tsp. salt
1/4 tsp. pepper
1/4 c. grated Romano cheese
2 cloves garlic, chopped

Add all ingredients together in a deep skillet and simmer for 20 to 30 minutes.
Gently crack eggs (we usually serve 2 eggs per person) into tomato mixture, cover and let cook 5 minutes. Remove skillet from heat, uncover and let stand 2 to 3 minutes.
Transfer each egg to a piece of toast (use good hearty rustic bread). Spoon over sauce, garnish with cheese, and season with salt and pepper; serve immediately.

Friday, March 7, 2008

Not Recommended For Sore Throats

Photo by Allysa/flickr.com

Passing by some peanut brittle at the grocery store the other day reminded me of a funny story. Many years ago one of my aunts had to go into the hospital for some minor throat surgery. The surgery went fine; the doctor said it would take a couple weeks for her throat to heal. This meant no solid foods for at least the first week. So my aunts menu pretty much consisted of ice cream, pudding, jell-o almost anything that was soft and cold or could be sipped through a straw. It’s not hard to enjoy ice cream and pudding for a couple of days but by the third day you are pretty hungry and are craving some serious food.
I believe my aunt was into her fourth day of recovery and an old friend stopped by with wrapped gift in hand. My aunt was happy to see her friend even though she couldn’t get the thought of sinking her teeth into some solid food off her mind. Her friend said here, this is for you it might help take your mind off of things; I know it is one of your favorites. I’m sure you all can guess what it was…..you got it; it was a nice big box of homemade peanut brittle. My aunt didn’t know whether to laugh or cry, her friend cried when she realized what she had done. Obviously it was not intentional; I think we all felt sorrier for the friend than we did for my aunt (how embarrassing). Needless to say everyone survived, my aunt got to eat eventually, her friend never lived it down and we inherited a funny story to tell at any given opportunity.

Peanut Brittle

2 cups peanuts (may substitute any nut)
1/4 cup water
1 teaspoon baking soda
1 teaspoon butter
1 cup granulated sugar
1/2 cup white Karo syrup

Butter a cookie sheet and set aside. Mix water, sugar, peanuts, and syrup in a 2 quart sauce pan. Bring to a boil.
Cook until candy thermometer reaches hard crack stage (310°F). Remove from heat.
Quickly stir in baking soda and butter, as it will harden rapidly.
Pour quickly onto a buttered cookie sheet and let stand for about an hour to cool.
Break up into pieces.

Wednesday, March 5, 2008

"1-2-3-4-5-6-7-8 Schlameel, Schlamaazal Hassenpepper Incorporated"

I came across this recipe for chocolate Pepsi it immediately transported me back to one of my favorite shows; Laverne and Shirley. Laverne’s favorite drink was milk and Pepsi she use to say that the milk took some of the fizz out of the Pepsi and the Pepsi took some of the “ick” (throaty sound?) out of the milk.
Laverne’s version used plain whole milk, this version uses chocolate. I must admit as much as I was curious about the drink when watching the show I never quite got up the nerve to try it. Then the more I thought about it, it dawned on me how silly, most of us have had coke floats or root beer floats at some point in our lives. When the vanilla ice cream melted in the float we still drank the soda, so it would stand to reason that the milk in the Pepsi would give it that same kind of melted ice cream taste. I guess there is only one way to truly find out…… this may take a while!

Chocolate Pepsi

8 oz. Pepsi, very cold
8 oz. chocolate milk, very cold
3 ice cubes

Put 3 ice cubes into very large glass. Add Pepsi and wait until fizz goes down. Slowly add cold chocolate milk. Stir gently, add straw don’t let this sit too long, best when ice cold!

Tuesday, March 4, 2008

Lima's in Disguise

Yuck, Lima beans, how many times have we heard that in our lives? How many times have we been the ones who have said it? My mother refused to eat lima beans as a child which was difficult since her mother often made succotash. My mother would pick out all the lima beans and hide them in her napkin. My mother’s hatred for the poor little lima bean carried over into adulthood until I made this recipe. Granted, I left out the fact that there were lima beans in it, I merely said that it was a bean casserole (very truthful). My mother loved this so much she had seconds, when I told her it was lima beans she did not believe me but by then she was hooked.

Unbelievably Good Baked Lima Beans

1 lb. dried lima beans (Yes you can substitute a different type of bean but then I'd have to change my story lol)
1/2 pint sour cream
1 1/2 sticks of butter (must use butter, no substitutions)
1 Tablespoon of molasses
1 1/2 teaspoon of dry mustard
3/4 cup of brown sugar (light or dark)

Soak 1 pound of lima beans overnight in 4 cups of cold water for each cup of beans; add more water if beans soak up the initial amount of water.
Boil the beans in the same water for ½ to ¾’s of an hour, add 1 teaspoon of salt; drain well. Mix the above ingredients together to make a sauce, bring the sauce to a simmer and then pour over the beans. Bake for 1 1/2 hours at 325 degrees in a covered casserole.

These beans turn out so buttery and creamy with a nice mix of sweet and tangy that it will make you think of lima beans as comfort food.

Sunday, March 2, 2008

Having The Blues Makes This Family Happy


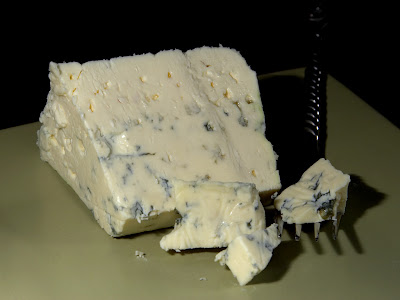
In our family loving blue cheese appears to be genetic. There is nothing funnier than watching us at a family get together when it’s time to dress the salad. As soon as the refrigerator opens and that little container of crumbled blue cheese hits the counter we all come running from every end of the house, just to snag a piece.
One of the funniest blue cheese moments was during a party when I was living in my first apartment. I decided to make my own chicken wings and blue cheese dip. I wanted the blue cheese dip to be loaded with chunks, so after the creamy part of the dip was made I added almost an extra pound of crumbled up blue cheese. I placed the wings and dip on the kitchen table for everyone to help themselves. While everyone was talking and mingling, I noticed that my mother and uncle never ventured far from the table. When I went to go get a wing I was looking forward to taking a dunk and pulling up a nice big chunk of blue cheese. To my surprise all I got was a nice creamy dip, no chunks. My mother and uncle on the other hand were grinning from ear to ear telling me how nice and chunky the blue cheese dip was. The two of them had been sitting at the table snagging all the chunks of blue cheese out of the dip.

Blue Cheese Dip/Dressing

1/2 to 3/4 lb. Blue Cheese (any style you like)
1 cup of sour cream
1/2 to 3/4 cup of heavy cream or buttermilk (depending on how thick you want your dressing)
1 cup of mayonnaise
1/2 teaspoon of garlic powder
1/2 teaspoon of Worcestershire sauce
1 teaspoon of lemon juice or vinegar

Mash Blue cheese in bowl; add sour cream or buttermilk, mayonnaise, garlic powder, Worcestershire sauce and lemon juice or vinegar. Blend until well creamed. This dressing keeps for several weeks in the refrigerator. It is delicious as a dip or a dressing.

May add extra crumbled blue cheese if you like yours extra chunky, just don’t invite my mother or uncle over.